Site Plans

The proper workflow for a multiple building project would be to have each building as it’s own separate file which are then linked into a standalone site file.  This is when we will take advantage of the publish & acquire coordinates function to set each files separate 0,0,0 to be co-ordinated with their actual locations relative to the site.

Screen002

working with revit & navisworks

Collaborating with Navisworks can be a great way to communicate with all the project partners, it can also create some headaches.  As collaboration gets more and more detailed each discipline needs to better understand the other disciplines and their working requirements.  (This makes any employee who understands more than their isolated discipline a much more valuable  asset!)  One workflow is to have both Revit and Navisworks open and to co-ordinate geometry by exporting NWC files from Revit and updating the Navisworks model.  In order to be effective and productive this has to be done as efficiently as possible, I am currently attempting this workflow only to be ground to a halt for 6-8 minutes every time I refresh my Navisworks file.  Although to be honest it is giving me both the impetus and the time to write this entry Smile  So let’s go over a quick how-to for using Revit and Navisworks to help speed the process up.

What to Export

Always export only your own information!  I can not emphasise this enough – everyone else is going to do the same so if you are the electrical there is no need for you to include the architectural model.  As an example, the electrical model would look like this

    Screen Shot 04-10-15 at 02.48 PM

So make an isolated 3D view (good practice is to name it “Navis” more on this another time) and go through the Visibility Graphics settings and turn off everything is not directly your own responsibility.  There is a quick category caveat – family elements set to generic or speciality equipment may be from many different disciplines, think about editing them to make your families your own discipline or use VG filters to isolate your own.

HOW to Export

During the export to NWC there is a place to choose the Navisworks Settings…

Screen Shot 04-10-15 at 03.08 PM


My settings look like this

Screen Shot 04-10-15 at 03.11 PM

convert construction parts: unless you are the GC you likely don’t need to use this

convert element ID’s: this is the unique identifier for each element it could be left on

convert element parameters: Basic Revit properties will be included in the Navisworks file regardless of this setting.  Checking this box will do 2 things during the export process:
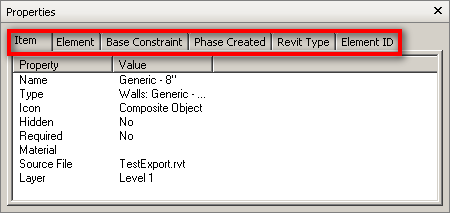
1.  Additional properties will be included with the resulting Navisworks file.  These include properties for Navisworks related to the element properties, object orientation, material information, associated level, worksharing information, family specifications, cuttability and Revit object category.
2.  Depending on the size and number of objects in your project, the export time can dramatically increase as additional properties will be translated.  For example a 100 MB file with this unchecked may take a few minutes.  Check the box and the export time may jump to 20 minutes.  This is something to keep in mind if you don’t need the additional information in Navisworks. – PLEASE PLEASE UN-CHECK THIS

CheckedConvertProperties

Unchecked

NoProperties

convert element properties : consider not including these (see above)

convert linked files: please don’t include

convert room as attribute: unless you are the architect this is not required

 convert URLs: will include any URL’s associated with families

coordinates: this depends on the project specific settings

divide file into levels: helpful as it divides the selection browser to include levels but it’s not required if you don’t need it

 export: current view: YES – this is why we made the “Navis” view – there is another reason to name it “Navis” but that is for another day

export room geometry: do you really need the room to be a transparent object in Navisworks getting in the way of EVERY attempt to select something? consider not checking this.

try to find missing materials: if they are missing here they are gonna be missing everywhere, who cares?  if you couldn’t be bothered to find them and set up your Revit with them then they are obviously not important enough to be brought into Navisworks.  besides we can add materials in NW and then render but again that’s for another day.

Revit Viewer

One way to get Revit into Viewer mode is simply to allow the 30 day trial to expire, however Revit does have a viewer (that does not of course use a license) and can be accessed from the Windows Start Menu:


clip_image001


The Viewer mode interface looks no different than the actual Revit interface as it is simply an unlicensed Revit that will allow a user to navigate the model and sheets as they like.


An important distinction about Viewer Mode is that it cannot be used to save (or save as) or to export in any way, it can however be used to print so long as nothing has been modified in any way. This ability to print can be helpful if the scenario arises that the Revit user is unavailable and Engineering needs to run the prints in their absence. (Again this is fine so long as Engineering does not make any changes, as soon as a change is made the print functionality is lost. In such an instance simply close the file – remember you can’t save – and re-open the same file and send it to print.)

How Revit Network Version Works

There seems to be a misunderstanding of how Revit (well all Autodesk products for that matter) runs in a network environment but it’s really quite a simple process. 

Understand that CADD programs are too large and to processor intensive to run across your network as they would grind all network traffic to a halt, therefore CADD programs need to be installed on the users local computer & not on the server.  There is a very small program that sits on the server and sends a tiny file to each users computer to track license checkout status.  When determining the number of licensed seats a company needs to purchase the question is not how many users we have corporately but rather how many users need to be running the software concurrently.

This means that you may actually deploy 10 installations throughout your CADD department but only purchase 8 network licenses.  While all 10 machines are capable to run the software only 8 may be in use concurrently.

More on Revit Backwards Compatibility

First let me state:  Revit is NOT backward compatible, click here to find out why not.

Ok so what’s the deal if client 1 is on release 2012 and client 2 is on 2013 how do they share the BIM model?

The short answer is simple really:

  1. Client 1 must upgrade to Revit 2013… or…
  2. Client 2 can export the 3d model to AutoCAD thereby losing all the Revit elements and BIM info and provide Client 1 with dumb solid 3d geometry only.

The decision to upgrade Revit versions becomes a little touchy especially around new version roll-out time due to this aspect of the Revit file format.  An important discussion to have with all project team members  is when to upgrade to a new version of Revit, especially if the project will span that time period when a newer version is released and users are looking to take advantage of the newest time saving features.

Let’s assume a typical multi-disciplinary project scenario and two clients; client 1 and client 2, each need to be aware of the backwards compatibility limitation within Revit.  As shown above if one party is on a higher release there are very few options available so project upgrading will have to be co-ordinated to occur either at the same time or once the project is completed.  With this in mind many offices choose to never upgrade a project.  Once a project is started in a given version is remains in that version forever.  In the future if a change is required the project can then be upgraded (without losing the original) to whatever year the current version requires, to facilitate this many code into their project numbering the Revit version number.

Multi-disciplinary projects must take Revit file version into account to ensure compatibility.

Revit into Civil 3D

  1. In Revit create a gross building area plan that outlines the building footprint
  2. Go to the application menu revit application, and Export>Building Site.  This writes an Autodesk Civil Design Exchange file (.adsk)
  3. Work your way through the dialog box making sure to visit all the tabs and fill in as much information as you can, including what 3D view you wish to export, project name and type, and what location you want to use.
    1. When you click on Export, there is an option to View Export Report after the process is completed – this will allow you to verify that everything you wanted to export was included.
  4. In Civil 3D, go to the Insert tab, click on Import at the bottom of the ribbon to see all options, and then select Import Building Site.
  5. Point to the .adsk file which you exported from Revit. A wizard will guide you through some options, including units, choosing a style, and selecting the insertion point for the model.
  6. You may need to scale, move or rotate the model to adjust it for the change in units (architectural to decimal feet) or location (local coordinates vs. state plane). Typical AutoCAD commands will address any of these minor modifications.

Revit LT

Revit LT serves the smaller, standalone BIM community – those engaged in “lonely BIM”.  This is a good tool for those firms that feel they just don’t need all that BIM has to offer but still would like to leverage the advantages that 3D enables.  It is important to note that Revit LT is not a different product than full Revit, LT simply has had some tools removed in order to simplify the authoring toolset and provide a more economical or entry level BIM offering.  Revit and Revit LT are otherwise exactly the same product, any file created in Revit will be completely accessible through Revit LT. (although as some of the tools are missing in LT you won’t be able to do much with those elements that fall outside of LT’s authoring realm)

As the interface is the same, navigating is the same & all the core tools are the same as full Revit, any diligent trainer who has the best interest of their students in mind will provide the same Revit Fundamentals courses as currently offered.

So what’s missing from the Revit LT offering?

Architecture

  • Parts & Assemblies, this is a construction modeling tool and likely won’t be missed
  • Stair by Sketch, this is the original way Revit made stairs & is augmented in full Revit by the more advanced Stair by Component feature

Structure

  • 3D rebar, with the size of firms that LT is targeted at this likely won’t be missed

MEP

  • THERE IS NO MEP CAPABILITY WITHIN REVIT LT

Advanced 3D Modeling & Presentations

  • Conceptual Massing / Adaptive Components, with the size of firms that LT is targeted at this likely won’t be missed
  • In-Place Modeling, as this is a poor practice anyway it shouldn’t be missed but some may users may feel differently
  • In-Product Rendering / Ray Traced Views, these are a convenience but since Revit can show the textures in the viewport, exported images to show design validation are still available
  • Point Clouds, with the size of firms that LT is targeted at this likely won’t be missed
  • Decals, these are a nice touch as enhancements to rendering but once again, with the size of firms that LT is targeted at this likely won’t be missed too much

Collaboration & File Linking

  • Interference checking / Copy/Monitor & Worksharing, again with the size of firms that LT is targeted at these likely won’t be missed
  • Copy/Paste From Links, just load directly from the libraries – no big deal
  • Custom Visibility of Linked Models, this is potentially the big one but a simple halftone operation is a suitable workaround

Exporting, Analyzing & Programming

  • Export to SAT, ADSK, gbXML, IFC, ODBC & family Types, with the possible exception of ODBC & family types and with the size of firms that LT is targeted at this likely won’t be missed
  • 360 Energy Analysis, this could produce a few headaches (once building codes start to mandate these reports)
  • 3rd Party Application Programming Interface (API), these provide targeted tools but once again, with the size of firms that LT is targeted at this likely won’t be missed too much

Free Revit project viewer

You can use the Autodesk® Revit® trial, available from the Autodesk website: www.autodesk.com, to view projects for free.

After the 30-day trial mode is over, Revit will run indefinitely in Demo Mode. When Revit is in Demo Mode, you can view files, but you cannot print them or save any changes you have made.

ScreenShot002

There is a good article about viewing Revit projects at iRevit.blogspot.ca

Revit LT

Finally ready, Revit LT serves the smaller, standalone BIM community – those engaged in “lonely BIM”.  This is a good tool for those firms that feel they just don’t need all that BIM has to offer but still would like to leverage the advantages that 3D enables.

As the interface is the same, navigating is the same & all the core tools are the same as full Revit, any diligent trainer who has the best interest of their students in mind will provide the same Revit Fundamentals courses AS currently offered.  (Of course any product demo for full Revit covers the same content)

A few key items have been removed but not much really…  So what’s missing?

Architecture

  • Parts & Assemblies, this is a construction modeling tool and likely won’t be missed
  • Stair by Sketch, this is the original way Revit made stairs & is replaced by the more advanced Stair by Component feature

Structure

  • 3D rebar, with the size of firms that LT is targeted at this likely won’t be missed

MEP

  • NOTHING!!!         [THERE IS NO MEP COMPONENT IN REVIT LT]

Advanced 3D Modeling & Presentations

  • Conceptual Massing / Adaptive Components, with the size of firms that LT is targeted at this likely won’t be missed
  • In-Place Modeling, as this is a poor practice anyway it shouldn’t be missed but some may users may feel differently
  • In-Product Rendering / Ray Traced Views, these are a convenience but since Revit can show the textures in the viewport exported images to show design validation are still available
  • Point Clouds, with the size of firms that LT is targeted at this likely won’t be missed
  • Decals, these are a nice touch as enhancements to rendering but once again, with the size of firms that LT is targeted at this likely won’t be missed too much

Collaboration & File Linking

  • Interference checking / Copy/Monitor & Worksharing, again with the size of firms that LT is targeted at these likely won’t be missed
  • Copy/Paste From Links, just load directly from the libraries – no big deal
  • Custom Visibility of Linked Models, this is potentially the big one but a simple halftone operation is a suitable workaround

Exporting, Analyzing & Programming

  • Export to SAT, ADSK, gbXML, IFC, ODBC & family Types, with the possible exception of ODBC & family types and with the size of firms that LT is targeted at this likely won’t be missed
  • 360 Energy Analysis, this could produce a few headaches (once building codes start to mandate these reports)
  • 3rd Party Application Programming Interface (API), these provide targeted tools but once again, with the size of firms that LT is targeted at this likely won’t be missed too much

Revit Backwards Compatibility

Applies to: Revit All Versions, all Disciplines

Question: Can I save my Revit file backwards to a previous version?

Answer: No, Revit does not have the ability (and has never had the ability) to save a version backwards to a previous version.

Revit changes extensively with each version, adding elements and parameters that not only add functionality, but form connections with existing Revit elements that have been upgraded from previous versions. While it might be possible in some cases to downgrade a new element into a previous version of Revit, at best it would arrive in the previous version as dead geometry. All of its behaviour would be dependent on the more recent version of Revit. All behavioural relationships established to other elements in the model would also be broken, resulting in unpredictable cascading behaviour which would likely the compromise the integrity of the model. A round-trip through a previous version of Revit would, at best, return a model that was substantially different from the model generated in the later version.

Tips: Before upgrading any project to a new version of Revit, be sure to:

  1. Save a backup copy in the previous version.
  2. Verify the entire project team is upgrading at the same time, including outside consultants.
  3. Communicate with the team about upgrading and upgrade timing.

You can run concurrent versions of Revit on the same machine: Revit 2011 and 2012 can run on the same machine.

Autodesk WikiHelp Logo